Showing posts with label Repairs and Upgrades. Show all posts

Sunday, May 16, 2010

Porta Potty Tie Down

From Misc Boat Stuff


After reading Fatal Storm: The Inside Story of the Tragic Sydney-Hobart Race I was thinking about all of the things in the cabin that might come loose in a knock-down or roll. I realized there was nothing stopping the porta potty from making a nasty mess in a knock-down or roll situation. I put four stainless steel eye screws into the bunk supports, then cut down a bungee cord net designed for the cargo rack on a 4-wheeler to fit over the top of the porta potty.

To use the potty, the hooks in the front are hooked onto the companion way and the potty is slid forward for use, then pushed back and re-secured. It fits snugly in place and should have no trouble holding the weight of the potty in roll over.

Saturday, September 26, 2009

Reefing the Main Sail

I don't have reef points in the sail, instead I have to pull the boom away from the mast and start twisting it to wrap the main sail around the boom. The problem I was having was the clip for the topping lift was catching on the boom as it twisted around. Here's the problem:


From Main Reefing Fix

You can see how the end of the hook would get caught when twisting the boom, I needed some way to make the twisting of the boom easier. I figured if I could attach a small piece of stainless steel (aluminum might not stand up to the stress) to the existing end-of-boom-sheeting, then attach the topping lift to that, I could keep it from hanging up while twisting. I haven't found a good local source of just random scraps of metal, so I went to the local hardware store and started wandering the isles. I found a u-bolt that had a flat piece of metal that looked like it would work.


From Main Reefing Fix

I picked up a small stainless steel carradge bolt and lock nut, which I used to connect the flat piece of stainless to the factory end-of-boom-sheeting arrangement.


From Main Reefing Fix

With the rounded head of the carriage bolt rubbing against the end of the boom instead of the topping lift clip, the main now reefs easily without any kind of hangup.


From Main Reefing Fix

Saturday, September 12, 2009

New Companionway Hatch

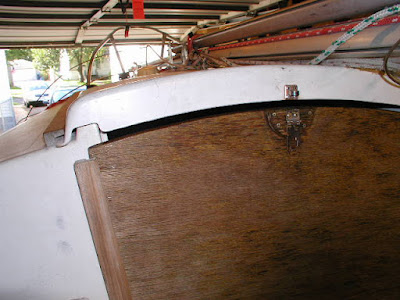
The companionway hatch that came with the boat was in rough shape. The lower starboard corner had rotted away, and the finish was shot. The original board also left a small gap between the board and the sliding hatch. It seems to me that this was done on purpose to allowed a little extra ventilation.


From Misc Boat Stuff

I know it wasn't the best choice, but I went with oak plywood. The boat spends 98% of it's time in my garage, so I think it should hold up OK. I used the old one as a template, but made the new one 1/2" taller. Fits nice and tight.


From Misc Boat Stuff

One week, a coat of stain, about 10 coats of spar varnish, and some silicone around the screws for the hasp and I've got a new hatch board that will keep the water out and looks a lot better than what was there before.


From Misc Boat Stuff

I think it turned out good, but nothing like a new piece of brightwork to make the rest of the boat look old and tired!

Thursday, September 3, 2009

Lazarette Hatch Upgrade

The early Com-Pac 16's had a lazarette in the aft portion of the cockpit which opened up into the cabin. The hatch cover had a small bracket that would attach to a bungee strap to hold the cover down. It looks like the very first owner of my boat installed a little hasp on it to further secure it. But you could still pull it off since there was nothing securing the aft part of the hatch to the boat (except for a bungee cord). The hatch could still come off if a large wave came into the cockpit, or if the boat were knocked down, so I made a bracket to secure the aft part of the hatch. The bracket is some flat stock aluminum from the local hardware store. I don't have a vise, so I had to improvise on the bending a bit, with less than spectacular aesthetic results (but highly functional). I coated the flat stock with some plasti-cote to cut down on the rubbing against the fiberglass, and I also got a small 90 degree piece of aluminum to make a bracket to tie a rope onto. The other end of the rope is secured to my scupper drain pipe. I was recently reading about rules for offshore racing and I remember one of them being that there had to be a lanyard on the hatch board since losing the hatch would leave a big hole in the boat. That got me thinking that if I removed the lazarette hatch in rough conditions (maybe to bail water from the bilge or to grab the gas can), it would leave the boat pretty vulnerable if the thing fell overboard. So a lanyard sounded like a good idea. I also left the original little bracket in place to use with the bungee cord, but I don't think I will be using it with the new configuration.

New bracket in place:
From Misc Boat Stuff


Close up of the brackets:
From Misc Boat Stuff


The whole thing in place:
From Misc Boat Stuff


Hatch closed and hasp secured:
From Misc Boat Stuff

Reparing Masthead Running Light

The previous owner of Plus Ultra had installed a masthead combination running/anchoring light, and it worked when we bought the boat in October of 2008. But when I tested it in early 2009, the anchor light was still working, but the running light was not. I spent considerable time swapping light bulbs, flipping switches and checking voltage across the entire pathway to the light. At every stage (switch, interior cabin, through-deck wire connector, mast base, masthead, light socket), but the navigation light would just not come on. So I started pulling everything apart, determined to find out what the problem was. It ended up being a corroded terminal in the through-deck wire connector. It was still making good enough contact to pass the correct voltage through, but it would not provide enough amps to light the bulb.

From Masthead Light


I cleaned the terminal and cut back the wire to remove the corroded part, then put it all back together and the light worked. While I'm grateful that the previous owner had installed the light, I was less than impressed with how it was mounted. He had used cheap hardware store brackets meant to hold up small knick-knack shelves, which he screwed into the mast with sheet metal screws. The brackets were flimsy, and the weight of the light rocking back and forth had broken the mount.

From Masthead Light


So I got some aluminum stock and made a sturdy mount and attached it with aluminum rivets. It looks a lot better, won't rust, and it's a lot more sturdy.

From Masthead Light